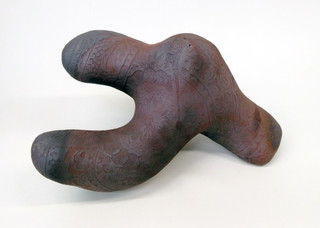
Outcome of Large Red Clay Figure
(Following on from a previous blog entry:)
So, this time I projected a the rim of an Iznik plate onto this figure and shellacked the pattern. Translating the colours into a two tone pattern wasn't difficult but I decided to add extra detail by having the white background filled in with dots.

Next I kept to the same pattern family of Iznik inspired decorations but drew those in freehand. This allowed me much more control over the scale and level of detail of these pattern areas. As the projected areas were quite large in scale which was accentuated through the distortion through the projection, I kept it much tighter in the hope that it would create a nice contrast. I also added a few larger areas without any pattern to add even more visual variety.


To mirror the dot patterns in the first areas, I added the fish scale pattern to the other other area. This scale pattern is often see on many original Iznik pottery, especially on the jugs.

Once the shellac has dried over night I was back the exposed clay in a water etching technique before it gets fired. I erred at bit on the side of caution with this piece and fired it in two stages: first a bisque firing to 1000°c and then in a subsequent firing in an electric kiln to 1260°c.
I had hoped to have the piece finished. However, somehow the firing showed up some mysterious drip marks on the surface previously undetected. Very, very annoying as it otherwise was a real success and came out the way I wanted it.


The drips must have happened before I even painted on the shellac as it is limited to the raised areas and not detectable in the recessed areas. No idea what it was. I really didn't like the yellow stain on top of the dark (left image). Thus I tried to sand it off with a diamond pad (right image) which removed some of the yellow but left a black area.

When left to dry the stains now also had light centres where the white grog was exposed by the sanding of those surfaces. Very, very irritating. The only way I could see to try to remedy it was by retiring the whole piece in the gas kiln in the hope that the higher temperature and darkening of the clay body in reduction will disguise these stains.
So, after firing it in the gas kiln to about 1280°c it has definitely gone a lot darker and the stains have disappeared. However, it has also lost the tonal definition between the dark raised areas and the lighter exposed grog in the recessed areas. The pattern is much more subtle and textural now. I'm not sure whether this is really what I want.

To my disappointment I have other faults now. Two of the 'legs', have been oxidised and not reduced as the rest of the piece. I quite like these lighter areas but not if they are localised to just to areas like here. Doh!

In addition, this firing also has brought up another problem: some of the bat wash has stuck to the three areas where they sat on the kiln shelf. This shouldn't have happened especially as this piece is totally unglazed.

So, I set about with wire brush, pointed metal knife and diamond sanding pads to remove as much as I could. It took me nearly two hours to remove most of it. However, one can still see the blemishes. This is rather annoying as my intention was that this figure didn't have an up or down but one should be able to position it any way one wanted.


I've decided to put this figure through another kiln firing. This time it will go into a hot electric kiln in the hope that some of the reduction can be reversed by oxidation. I am not sure that this will work but it is worth a try. I am also making sure that I am not positioning it on the same three points that had the bat wash stuck to it in the hope of burning out some of the blemishes so that they blend in.


Result:
Generally refiring has lightened the overall colours but the two feet are still much lighter. I don't like it. At the same time it has exposed the dark splash again.

The other blemishes where I tried to sand away the bat wash have not gone away.

However, the surface of the clay has gone smoother again and doesn't look as volcanic.
What now? One last firing in the gas kiln at 1280°c. I will change the direction in which I position this piece in the kiln, i.e. turning it on its side. Hopefully this will avoid the same areas getting oxidised or reduced the same way they were during the first gas firing. I will also stand it on small porcelain kiln stilts to avoid more areas with fused on bat wash.


Result:
I was hoping for a more even flashing over the piece, i.e. not just localised lighter spots at the end of two limbs. I think I got that even though I've now got two darker areas at the end of two other limbs.


Left: The tips of the kiln stilts have embedded themselves into the surface of the clay.
Middle: Sanding blemishes just as noticeable as before.
Right: Drip visible but maybe not as prominent with all the other variations of colour now.
Here are some photos of the finished piece.
What now? Well, I think five kiln firings for one piece that isn't even glazed it enough! I have learnt a lot and may do another similar piece but will try to avoid any mystery drips, which were the initiator for these multiple firings. Maybe I can still remedy some of its faults by polishing or waxing the surface but it will never be perfect.


